Tessuti Patterns Frankie Dress: Holiday Edition

Merry Christmas and Happy Holidays!! I hope you all are doing well, and enjoying whatever festivities may be going on in your neck of the woods. I'm having a big dinner at my house with a whole bunch of family, and we are doing our traditional, non-traditional meal: a BBQ. We have burgers, smokies, and hotdogs, with various BBQ style sides like salads and chips. It's definitely not the regular turkey dinner, but we really like it and we always have lots of fun.

Anyway, I thought it would be nice to share my Christmas dress on Christmas day. I probably won't wear this on Christmas Day, although it's comfy enough to do so. I think I will be to nervous that I will spill something all over it. But you never know, I might end up brave enough! Ha ha! Anyway, I actually made it for John's company party, and it was lovely to wear that night.

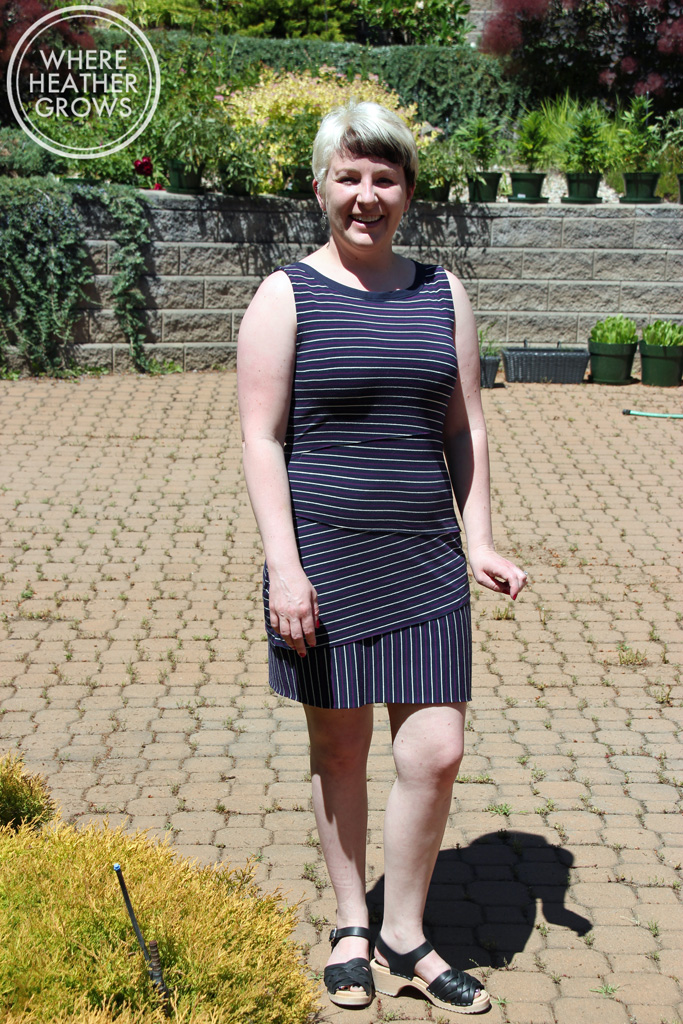
This is the Frankie Dress by Tessuti. I have been pretty much obsessed with this pattern since I first saw it, but for some reason I was a bit reluctant to pull the trigger and buy it. I think in my mind, I was thinking it was more of a spring/summer pattern so I was holding off. 

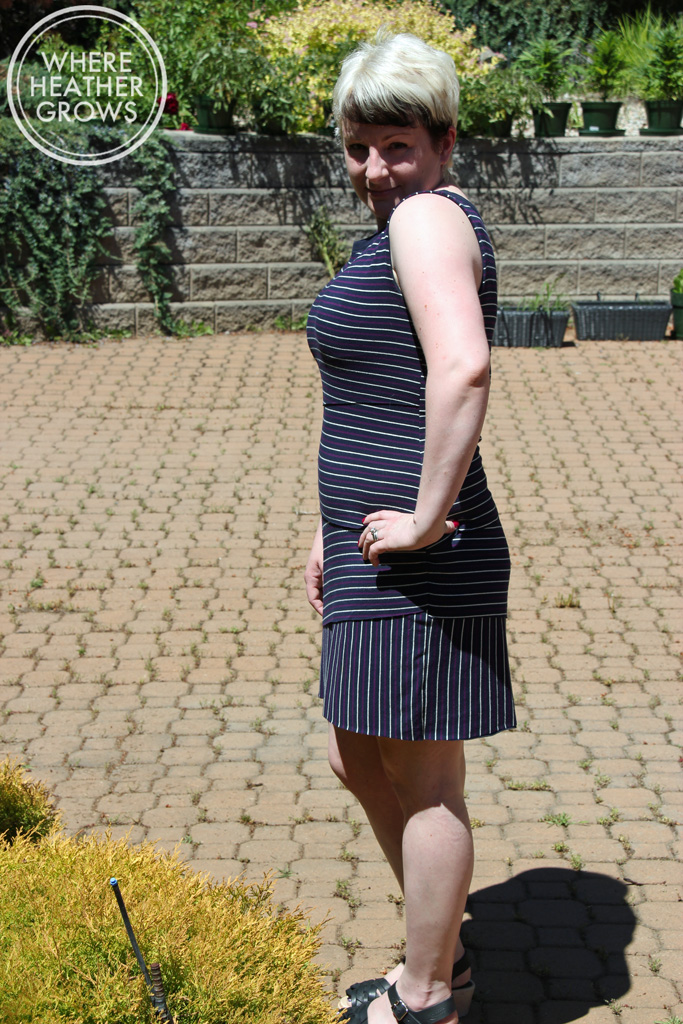
Anyway when I saw this gorgeous stretch velvet on the Blackbird Fabrics website, I had a lightbulb moment! I thought the Frankie would make a fantastic velvet dress.

And I was right! This dress turned out exactly as I hoped it would.

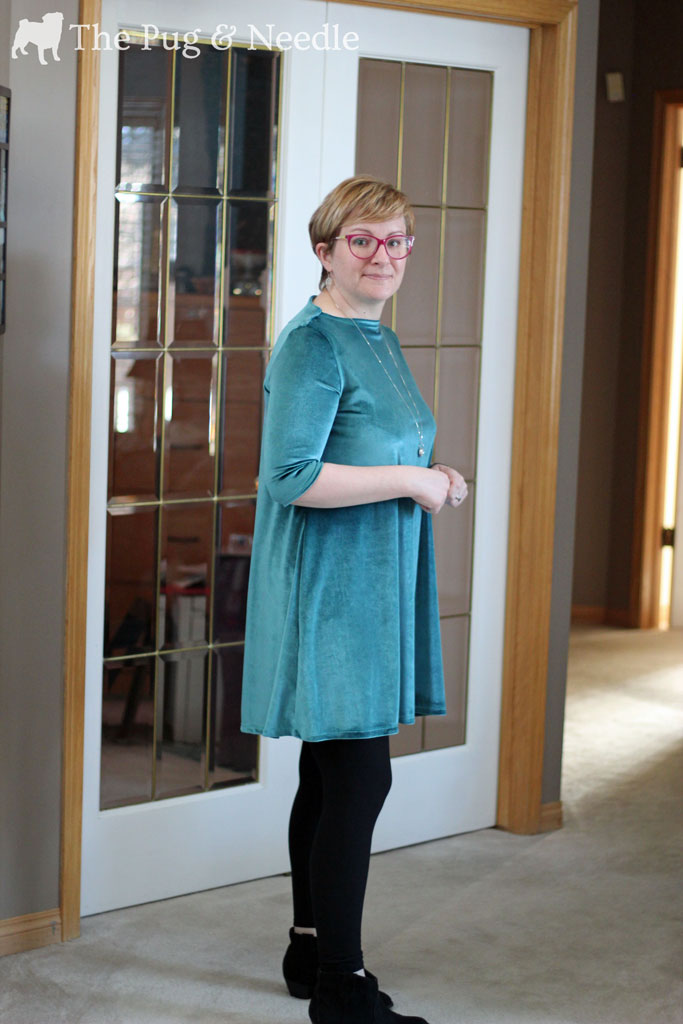
I whipped up a quick muslin out of a knit that had similar stretch, and then cut into my velvet. I made a straight size medium, and shortened it by 3 inches. When I shortened it, I had a bit of truing up to do at the side seams, so I ended up making it closer to a size small from the waist down, rather than the medium.

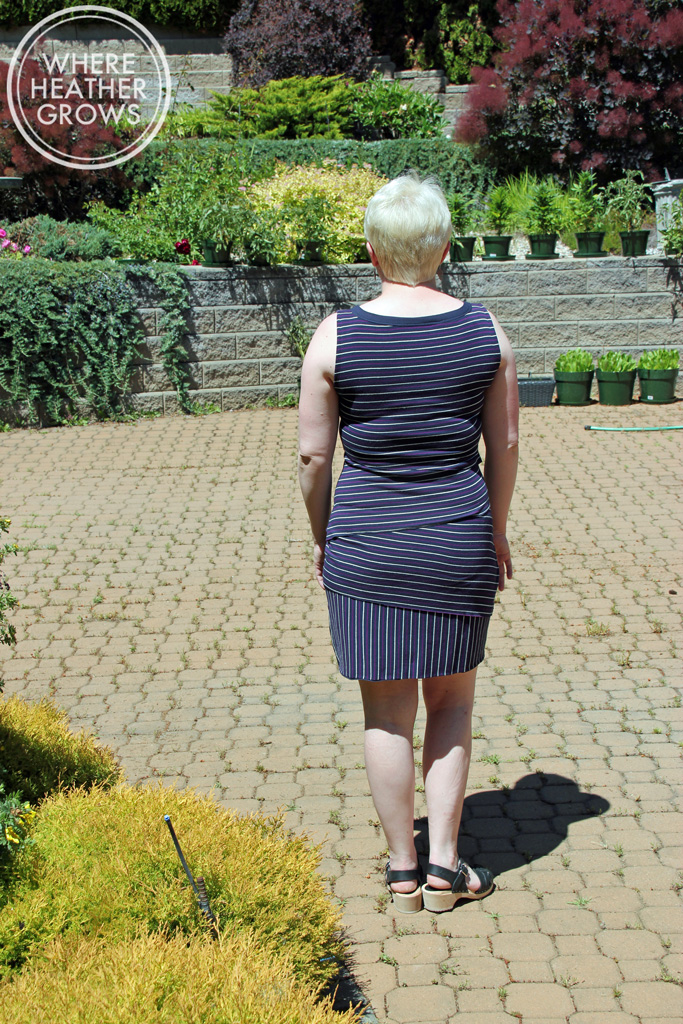
This stretch velvet was super easy to work with. I've heard horror stories about working with velvet, but lucky for me, I didn't have any of those bad things happen. I did however have a bit of a serger issue. When I was inserting the sleeves, my serger began to "eat" my fabric and get jammed. I had a bit of a meltdown as I was sure my dress was ruined and of course I was sewing it the night before the event. Anyway, I calmed down and rushed my serger into the store that I bought it at the next morning. They assured me it was my blades. Apparently the bottom, stationary blade on my serger had become dull. It's supposed to last the life of the serger, but because I have hit some pins with it on occasion (oops!) it had dulled. The upper blade was dull as well, so once they replaced those, which was a 5 minute, but $50 job, I was back in business. Anyway, if you look closely at the back of the armscyes, especially on left, you might see a bit of wonkiness, but I really don't think anyone noticed, or will notice in the future. Phew!! Thank goodness for knits! Oh and this is also the reason it looks slightly chokey at the neckline too. My muslin did not look like that at all.

Anyway, I absolutely love this dress, and I feel so good in it. I wish I would wear it every day! I love it paired with my little black booties too. I wore full footed tights the night of the party, which in my opinion, looked better as you don't get that little pop of skin at my ankle breaking up my leg. Ha ha!

I have some more stretch velvet in my stash, so I'm dreaming up more ways to use it. Leggings perhaps?

I hope you all are having a lovely day, and I wish you lots of joy and happiness this holiday season!

Happy New Year!

Oh dear! How did it get to be January 15th already?!? I had hoped to blog a bit more than I did in the past month, but so many things got in my way. I caught a terrible "man cold" from who knows where, which kept me in bed for days, and then sadly, a few days after Christmas, my dear Uncle passed away. He had been battling pancreatic cancer for the last year or so, so it wasn't really shocking, but having just had a really great visit with him over Christmas, it was a surprise that his death came when it did. I am so grateful that I was able to have such a great chat with him on Boxing Day and I will hold that memory of him for a very long time. Anyway, enough about that. Let's talk about sewing! 

This is the Silvia Coatigan by Schnittchen Patterns. (Heads up - these are not the greatest photos. The white background is not really doing me any favours, plus I seem to have *ahem* misplaced my remote, so I had to do the whole push the button and run in front of the camera thing. Then just as I was all set up it started to snow, so if you see weird white flecks, they're snow flakes.) 

This pattern wasn't really on my radar, until Caroline (of Blackbird Fabrics) made mention of it somewhere (I can't find the post on her blog or instagram, but I swear she mentioned it somewhere). Anyway, I checked it out, and I thought it would be a great in between seasons piece. Calgary is so weird in the winter because of the Chinooks. One day it can be freezing and you need a super warm, down parka, and the next day it's sunny and warm and you are sweating in said parka. So I thought this would be a great "coat" for those days, but I also wanted to keep it soft and fairly unstructured so that I could wear it inside when I'm feeling like I need an extra snuggle.

I ended up choosing this fabulous wool boucle from Blackbird Fabrics, and it worked out perfectly. It's nice and warm, and wooly, but still soft and drapey like a cardigan. I thought that I might be able to get away with not lining this little number, but when the fabric arrived, I decided it was a bit too itchy against the skin to go without a lining. 

I have never worked with wool fabric, or wool coating, so I wasn't exactly sure how to pre-treat it. I did a bit of reading, but then emailed Caroline for some advice. As always, Caroline was very helpful and after emailing back and forth with her,  I decided to try the steam function on our new dryer. After about 30 minutes the steam cycle was complete and the wool looked great with very little shrinkage. If our dryer didn't have that feature, I think you would have steamed it with my iron, but that seemed like so much work - especially when there is another option. I also asked Caroline for her suggestions about lining, and she graciously sent me some lovely modal knit from her personal stash. Sewing friends are the best! The knit fabric is perfect!

As for the pattern, I have never worked with a Schnittchen pattern before, so I was very surprised that the pattern pieces were contained in two separate pdfs. This took me a while to figure out as there was no print/pdf layout. At first I thought I was missing some pattern pieces, but then I remembered the second pdf, and lo and behold, there they were.  This was not my favourite experience putting together a pdf to be completely honest. I had a hard time getting all the markings to match up and the borders weren't super clear, so my pieces were slightly wonky in a few places. Now this might be my printers fault, as it can be cranky sometimes, but I haven't had this much trouble with other pdfs, so I'm not sure.

All that being said, this coatigan came together rather quickly, and I mostly put it together with my serger. I did have a bit of trouble with the lining but I think that's because I haven't lined very many coats/jackets, so I didn't really know what I was doing, plus I was using a knit fabric with a woven. The instructions are only written (and fairly brief but they are translated into english so that's a good thing) with no diagrams which probably works just fine for an experienced coat sewer, but I am very much a visual/kinetic learner and so I require more hand-holding than just words (at least when I'm doing something for the first/second/third time). Anyway I turned to Jen's fabulous tutorial and kinda did my own thing. It turned out pretty well, so I can't really complain. And the knit lining is part of what makes this so cozy, so I'm really happy I didn't leave it out. 

I have pretty much worn this non-stop since I finished it. I wore it around the house with my Hudsons while I was sick, and I reach for it pretty much anytime I'm running out the door (unless it was one of those really cold days we had there). It's slightly bulky, but I think that's part of the appeal. It's like being wrapped in a blanket and I feel really stylish when I'm wearing it. I also love the colour and it goes with everything.

According to the size chart, I should have made a size 42, but I ended up going with a 40 because I knew I was mostly going to wear it open, and I didn't plan on adding any closures. I didn't make any changes to the pattern at all. I thought I might have to shorten it, but I didn't and I think the length is just fine on me. I'm really happy with the fit, and I know I will continue to wear this a lot.

I hope you all are doing well and enjoying your New Year so far. I feel kind of crappy that I didn't get any year end roundups done like I did last year, but C'est La Vie!

Have you ever made a Schnittchen pattern? What did you think?

I'm Back.....and with more Jeans too! (I know you're shocked)

Do you ever get so far behind with blogging that you want to just forget you even have a blog, and pretend like nothing ever happened? You can't be behind on a blog you don't even have, right? I mean, I only document via Instagram, everyone knows that right? If I go long enough, people will forget I had a blog, right? Right? Right? LOL. Ugh! I really want to be someone who regularly updates their blog, but sometimes I would just rather sew, or knit, or watch Fargo (have your watched it yet, the series is awesome and the first season is filmed all around Calgary!!) or reorganize the pantry, or snuggle the pugs, you know how it is, don't you?

Anyway, I'm sorry for the unintended break (I'm also super behind in my blog reading, so if you haven't noticed me in the comments, don't worry, I'm getting there. LOL). We are now back in Calgary, enjoying the snow (and by enjoying I mean staying inside as much as possible but looking at it through the window), our cabin is closed up for the winter and we even had a trip to Iceland in there too. So lots of stuff has happened in the last month, but not a lot of it was sewing related.

I have however done a whole ton of Christmas sewing over the last 2 weeks, and I really want to share it with you, but as it's all gifts you'll have to wait until after Christmas day. So in the meantime I'll entertain you with some old photos (we took them back in October, I think) of more jeans and a linden. An outfit that was unapologetically copied from Katie (imitation is the sincerest form of flattery, right?). When she first posted her fall Linden and jeans, I knew I wanted an outfit just like it!

So this is yet another Linden sweatshirt; I have a whole closet full of tops made from this pattern. It's so quick and easy and can be made in a variety of knit fabrics. I've even seen a few woven ones pop up on the internets too, but I haven't tried that yet. In the interest of copying Katie and for something a little different, I went with the split hem variation, and I really like it. 

The fabric I used for this sweatshirt is a french terry that came from Girl Charlee many moons ago (I'm not exactly sure what I bought it for, but it's been in my stash for a while). It's really warm, and soft, but the stripes were terribly off grain, so I did the best I could. It does look slightly off when you look closely. The ribbing came from my local Fabricland.

The jeans are another pair of Angel-Ginger Hybrids, exactly like this pair, and this pair. This time they are made from a lovely charcoal "black" Cone Mill's denim. This denim is definitely not a true black, it's more of a grey, especially after a few washes, but I really like the colour. It goes with pretty much everything in my closet, and it's a little more casual than true black which suits me just fine.

So even though these and my other Angel-Ginger Hybrids, fit really well, and they are mid-rise just like I intended them to be, I'm finding that they still aren't perfect. I really thought I was happy with a "mid-rise" but I've noticed that during and after sitting the waistband tends to roll. So I'm starting to think that I either need to go back to a "low-rise" or try a full "high-rise" jean. I've only ever made the high-rise version of the Ginger jeans once, and I don't think I gave them a fair chance. At the time, I wasn't really used to a higher rise, and I didn't make the now standard adjustments I usually make to jeans. I'm much more experienced at jeans now. 

I've also recently purchased Lauren's new Birkin jeans pattern, so I'm excited to try that out too. I'm not 100% convinced that it's going to be perfect on me, but I am excited to try it out (especially after seeing Meg's smokin' pair). I'm also really looking forward to the skinny version Lauren intends to release soon too. So expect to see some more jeans sewing from me in 2016! Woo hoo! I've also forayed into sewing jeans for John as well, so I'll do a post about those one of these days as well.

Anyway, I'm glad to be back on the blogging wagon, and I'm hoping you are all doing well too. Are you doing any Christmas sewing? Gifts or maybe fancy Christmas outfits? I wore the same Anna I made last year to John's company shin dig. No one noticed and I got lots of compliments! Lazy seamstress for the win!

More Jeans & Other Makes too!

Hola peeps! How are you all doing on this fine Friday the 13th? Things were going pretty well for me until I had almost completely finished this blog post and Safari crashed and I lost it all. UGH!! (It actually happened twice, so I switched over to Google Chrome and that seems to be better.) And I don't remember everything that I wrote! I guess it's a sign to start over. Anyway, I'm back with surprise, surprise: another pair of jeans, but not to worry, there are some other new me-mades in this post too. Woo hoo!

So this ensemble consists of another pair of Ginger-Angel Hybrid jeans (Angers? Gangels? Ginangels?), a sleeveless Granville, and a Hemlock Tee. All worn shamelessly with my slippers! What can I say, I love my fuzzy slippers!

So let's start with the jeans. I don't really have anything new to say about the pattern, as this pair is pretty much exactly the same as my last pair.  What does make this pair special is that they are made from a gorgeous 9oz Cone Mill's Denim from Threadbare Fabrics. There is just nothing like a good quality denim. It's so much nicer to work with, it presses nicely, and the best part, it's recovery is amazing. I can wear these baby's for days and they totally maintain their shape. (And by days I mean, I can comfortably wear them four or five times before I need to wash them, unless I spill something on them, ahem coffee,  which is pretty common for me 😝). The 9oz denim might actually be a little light for a regular pair of jeans, but I just couldn't resist the colour. It's a slightly lighter shade than the regular indigo you usually see in denim. It's not showing up very well in these photos, but it really is a bit lighter. While the weight of this denim might be a little lighter than what I'm used to, it makes these jeans extremely comfortable, and stretchy (they almost feel like leggings)! I do miss the (ahem) support that a slightly heavier denim would provide though. Plus because I used a quilting cotton for the pockets, you can sort of see the pocket outline through the denim, but that is mostly my fault as I should have went with some lighter scraps, but who can resist surfin' cats?

When I got my hands on this denim, I debated making something else out of it due to it's lighter weight. I thought it might make a lovely Chardon or Brumby skirt, a shirtdress or a jean jacket, or even quilted with flannel for a cool Tamarack jacket, but in the end I decided a pair of jeans would probably get the most wear. I almost tried out this pull on version (which I think would be perfect in this weight), but I was too lazy to try a new pattern this time, and I really wanted to make another pair of Ginger-Angels as I wear my first pair a ton!

For something a little different I decided to go with some red topstitching. I remembered Amy's pair and I loved how the red looked against the dark blue. I'm not sure my red pops quite as well as it did on her pair, but I still really like it. I think one of the really cool parts of making your own jeans (and your own clothes for that matter) is that you can change up those little details. I'm also planning to add rivets, but I haven't decided on the colour yet. Any thoughts? (I have brass, gunmetal, silver and copper.)

Anyway, enough about the jeans, let's talk about the tops. The lovely striped number is a Grainline Hemlock.  I made a Hemlock months ago, and decided that the boxy, one-size fits all pattern just wasn't for me. It seemed too shapeless and long for me, but then I kept seeing cool ones pop up in my Instagram feed, so I decided to give it another go. I mean, the pattern's free, so why not? This time I decided to forgo colour-blocking, shortened the body by 2.5", and made it out of a stripey fabric. I mean you can't go wrong with stripes, right? I am so happy that I gave it another shot. I have been wearing the two that I made pretty much non-stop. It's amazing how something changes when you get the length right. The other one I made is striped too, but I haven't blogged about it. I think this fabric came from my February Knitfix pack from Girl Charlee. It's a french terry, but it is on the thin side; you can easily see the pockets of my Granville coming right though it, so it might not be the best for layering over tops.

All summer, I really wanted to make a pale pink Granville top. I even found the perfect fabric at Blackbird Fabrics (it's a beautiful Italian Linen just like this one), but for some reason, I never got around to making one . So in my recent fit of cutting out 5 Granvilles, I decided to include the pink linen. It's a little seasonally inappropriate, but I figured it would work well under sweaters, and worst case scenario: it just hangs in my closet for a few months and then I know it will get a ton of wear when it warms up in the Spring and Summer. I had planned to use some cute little buttons, but when I spotted these cool marble snaps in my stash, I knew it was meant to be. I know they came from Snap Source because they were still in the package, but I couldn't find them on their website.

It still looks a little stiff, as I have't washed it since I made it and I starched it like crazy so it would be easier to work with. Linen always seems to stretch out and go wonky on me, and I found that spray starch really helped. 

Anyway, I hope that you all are having a lovely night, and please hug your loved ones tight and wish or say a prayer (or whatever you do/believe) for peace and the people in Paris. I don't really "pray" myself, but after crying while watching the news, I am trying hard to hold a space of love instead of fear (which I know is really hard), because a big point of these attacks is to evoke fear.

                                                                                                          Source

The Quest for the Perfect Jeans: Angel Bootcut Jeans Part 2

And we're back.....

Hey Everybody! What's chippin' your potato? How's the week going so far? I guess it's only Tuesday so it might be too soon to tell. As promised I am back with yet another jeans post. I mentioned in my first Angel Jeans post, I felt like I couldn't really give the pattern a proper review as I had done all this crazy slimming down to the legs, and I messed up my lengthening only the front rise. So I decided I would make it up again, but this time make it as close to the original as possible no messing with the leg width or the rise, or anything like that (I did make a few changes to make them fit me better, but that's about it). Alright, grab your coffee or tea, and let's get down to business

After wearing my first pair a few times, I decided that not only did the denim bag out quite a bit, they were just too big. I had chosen my size based on the size chart, but after contemplating it for a bit, I decided that this pattern must not be drafted with negative ease. It calls for stretch denim, but I think I must like my jeans much snugger than what Angela Wolf has drafted for. So I consulted my trusty Ginger Jeans pattern, and used the finished garment measurements to help me figure out what size to make. I ended up going down to a size 6. A size 6, can you believe it? I went down 3 sizes. Whoa!

The denim I used for this pair is an Italian stretch denim I picked up at Ditto Fabrics in the UK (and by picked up, I mean I bought it online).  It's actually really quite stretchy, so if I were to make these again in a stiffer denim, I might need to go up a size.  I have been on the hunt for the perfect denim for quite some time, and this was one of the many denims I have acquired (for research purposes of course). Anyway, I was bummed to find that it is no longer listed on their website because it's really quite nice. It's stretchy and comfy and the recovery is quite good. These pictures were taken on my second day of wear. They get pretty stretched out and need a good wash after a full second day though. And looking at these photos now, I think the fit looks better when they first come out of the wash. 

When I first tried these on, I was like, "I can't go back to wearing a flared/bootcut jean!", but after wearing them a couple times, the style has really grown on me. I think they are going to look really good with some little wedge booties I have in the back of my closet (I still don't want to admit that it's boot weather). They make me feel reminiscent to when I was about 17-18 years old and this was the style. I had traded in my beloved men's Levi's 501s, for a flared Silver Jeans pair. It was a radical change for me at the time, but I I remember feeling very ahead of the trend. 

I will get into the fit details at the end, but I have to say I'm pretty tickled with how these turned out. I think the fit is pretty close to perfect, and the only thing that I really want to change is to move the back pockets closer together. They are a little farther apart than I would like them, but not enough that I feel compelled to unpick and reposition them. And looking at these photos, I might need to scoop out the back crotch curve just a little more too. It's difficult to fit the back on your own. I usually get John to take a few iPhone photos when I'm in the process, but it's hard to see fit issues in dark denim in photos.

I used two buttons this time for my wide waistband, and unfortunately, I think I put the buttons a little too close together which seems to  cause the top of the fly to gape open a little. It's not really that big of a deal as most of my shirts cover it (speaking of which do you like my new longsleeve tee? It the Grail tee by Vesta Patterns), and really it's not that bad.

It's a bit hard to see it in the photos, but this time around I used a yellow variegated topstitching thread. It's a subtle change from the gold, but I really like it. And I'm happy to say that I get a little bit better at topstitching every time I do it. Hurrah!

Okay so here are the changes I made this time:

  • started with a size 6 (my last pair was a size 12)
  • lengthened the front crotch curve by 1" and the back by 2" using this tutorial again
  • shortened the legs at the lengthen/shorten line by 4 inches, but cut another inch off the hem at the end too
  • decided when I basted them together to check the fit that I might need a full or rounded thigh adjustment, so to compensate, I sewed the side seams from the bottom of the back yoke to the knee with a 1/2" seam allowance and the rest at 5/8" - next time I'll just add a little extra to the side seam when I cut them out
  • cut 1/2" of width off the belt loops piece to make the belt loops slightly narrower
  • did not interface the waistband, except for right at the button hole
  • sewed 1/4" elastic into the waistband (at the top) in the hopes that it would work as sort of a stretchy stay tape and help keep my jeans from falling down - I think it's helped a little but I may have needed to stretch the elastic more when I was sewing it in

I thought I would include a photo of my traced pattern pieces so you can see what the curve looks like. And check out the cute little spiral bound book for the instructions.

So there you have it. I'm really happy with this pair of jeans, and I have been wearing them way more than I thought I would. I have been a pretty die-hard skinny jeans girl for quite some time, so it's nice to add something different into the mix. I am hoping to make another pair just like this, but leave them a little longer to wear with heeled boots (and maybe fix the back pocket position too).

And as if this post isn't long enough already, I feel like I should include a few details about my t-shirt too. As mentioned, it's the Vesta Pattern's Grail tee. I just couldn't resist the cute drawings, and I really liked the idea of the different body shapes offered, plus it has two neckline options (a scoop and a crew), 3 sleeve lengths, and the option of making a tank top. You can buy the pattern in either the S Shape (for an hourglass shape), the E Shape (for a more straight body type) and the A Shape (for a more pair shape). I went with the S Shape, and made my first Grail tee a Large according to my full bust measurement. While the shape was really nice, it was really tight across the back, shoulders and boobs. [Super honest side note: Before I bought this pattern, I was humming and hawing between it and the Lark from Grainline, but the cute drawings and the idea of supporting someone brand new sucked me in! And hey, maybe it would be great! But after I made my first version, I was kicking myself, wishing I had bought the Lark. Lesson learned! (And who are we kidding, I'll probably end up buying the Lark anyway - I need that boatneck! I'm such a pattern junkie!)]

For this version in the photos, I made a straight XL (which is the biggest size) with the crew neck, and the fit is much, much better. I am happy with it, but beware that it runs small, and/or you may need an FBA if you have big boobs. This lovely long-sleeved number is made out of some amazing bamboo striped knit from Blackbird Fabrics, and it's soooooo soft and cozy! It's sold out now, but I'd keep an eye on Caroline's shop because I'm sure she'll restock it. She does have this glorious tie-dye bamboo that I bet is just as soft (well actually I know it is, because I have some of it too but in navy).

And with that, let's wrap this post up! If you've made it down to the bottom, thanks for hanging in there, and if you just looked at the photos and scrolled down, you missed all the details!! Go back!! Kidding! Kidding, I'm kidding.  I hope you guys are having a lovely Tuesday, or whatever day it is when you catch up with your blog feed! And not to worry, there are still more jeans posts to come!

The Greenwood Tanks

Hullo everybody! I feel like I have been trying to write this post for days, and it just hasn't happened. Writer's block or laziness? I'm not sure. Life just seems to get in the way sometimes, and it seem that the blog gets sent to the back burner. But I have been finding lots of time to sew, and to fit so I have lots to share. I have been going further down the rabbit hole with fitting, and having some success in some things, not so much in others. But with every step, and every thing I try, I learn a little bit. Not just about sewing and fitting, but also about myself and my shape. I'll save my introspective findings for another post though. For now, let's get on with the Greenwood tanks I recently made.IMG_7062Have you seen this pattern yet? It's a great wardrobe staple from Straight Stitch Designs. I first spotted it on Meg's blog, and then my good friend Katie recommended it to me too, so I had to give it a shot. I'm not really one for tank tops on their own (I usually use them as a layering piece), but we've been spending a lot of time in BC this summer and it has been really hot. Heatwave anyone? Anyway, a simple tank really fits the bill to stay cool - well that and air-conditioning. The pugs and I could not live without it. And slurpees, let's not forget about slurpees. But I digress.... IMG_7063I quickly whipped up a size 12 tank based on my measurements, and discovered (of course) that it was too big in the shoulders and pretty much all over. It was okay across the chest, but it just didn't feel right. The straps kept sliding down - not cool. So I took your guys' advice from my post about my shingle dress, and decided to do some adjustments to make this tank fit right. I chose my bust size (an 8) based on my high bust measurement, and then I graded to a size 14 from the waist to the hip based on my waist and hip measurements (also I didn't want a super tight fit across the belly fit). Then I did an FBA of 1.25". But doing the FBA created a dart, and I really didn't want to have a dart so I used this tutorial by Maria Denmark to remove it. Sounds a bit tricky, but really it's easy. It just involves a lot of cutting and taping.

IMG_7064Then I did some alterations to the back piece. I should mention that I chose the scoop neck, scoop back version of this pattern, and it uses the same pattern piece for both the front and the back. But if you are like me and you need to do a bunch of alterations, you need separate back and front patten pieces, so trace/print two. Anyway, for the back I did a 1/4" high round back alteration, and I also did a 1/2" forward shoulder adjustment, both which I learned in the book Fit for Real People. Also, because I am short, I shortened it by 3 inches. Phew, seems like a lot of alterations for a knit tank doesn't it? But I'm pretty happy with the results. And now I have a solid TNT staple tank pattern. I used some black cotton jersey from Girl Charlee that I had in my stash for this version and I know it will get lots of wear. There still seems to be a bit of pooling in the back, but I'm not sure if it's just hung up on my bra, or what going on. Your guys' advice is always welcome there, but I'm not really losing sleep over it.

IMG_9863So that's what my two pattern pieces look like. Pretty cool right?

Before I made the Greenwood tank, I took a shot at the Aurora tank from the June issue of Seamwork. I did not like the construction of that tank at all, in fact I found it incredibly frustrating, and in the end I didn't really like the style on me. (What is up with these Seamwork patterns? They really seem to be hit and miss for me - anyone else tried them?) It looks so good on a lot of people, but I found the gathers a bit bulky and I think the instructions and the construction of it just left a bad taste in my mouth, so I just didn't want to like it. I did however like the curved hemline and the way it fell away slightly from the body. John agreed and said, "well why don't you just combine the two?". So that's what I did. And I made 4 more tanks just like that.

IMG_9877

I may have gotten a little carried away and made them a bit too short, but I'm still quite happy with them anyway. See what you think:

IMG_7053

Hello! Everybody needs a super bright tank top right?

IMG_7052

IMG_7050

IMG_7067

IMG_7068

IMG_7069See the back doesn't look nearly as bad here. Maybe it's still just a little bit too tight, and that's why my bra line is so obvious, or maybe I'm just being too picky now.

IMG_7054

IMG_7056So I think that's enough photos of me for now, don't you? All of the striped fabrics came from Fabricville in Montreal (I'm not sure why Fabricville always seems to have a lot more and nicer knits than Fabricland in Calgary when they are the same company, but they do). I think they are all a cotton/rayon jersey blend, but I'm not 100% sure. They have great horizontal stretch, but not much vertical stretch. They worked perfectly for these tanks and I have a bit more left over for t-shirts too! That's another great thing about this tank: it doesn't require much fabric, especially when you're short like me.

I just realized that I didn't get any photos of the skinny striped one I made, it's made from a remnant I got from Marcy Tilton's website, and it's super comfy, but not the easiest to photograph. Those mircostripes always look a bit funny on a computer screen.

Hope you all are having a lovely summer, and for all my fellow Canucks out there, Happy Canada Day!!

Vogue 8904 - The Shingle Dress

Ola friends! Has it really been 2 weeks since my last post?? Crazy! I don't really have any good excuses for you other than I am a huge procrastinator and my blog always seems to get pushed to the bottom of the list. But not to worry, I am still sewing my little heart out and I have lots of projects to share. So let's start with something a little different shall we. IMG_6893Many moons ago, when I didn't sew but was still a clothes addict, I came across the Column dress at Anthropologie. I remember thinking that it was super interesting looking, and one of the sales girls told me that everyone who tried it on, loved it, and that it seemed to be universally flattering on every shape. Needless to say, I never got the courage to try it on, but it stayed on my radar. When I saw Marcy Tilton's Vogue pattern (8904)  for the same style of dress, I decided to buy it. And it sat in my stash for months.

IMG_6903Then I spotted Meg's version and it got added to my queue. I was still a bit apprehensive to make it as it seemed like it would be a lot of work with all those shingles, but I couldn't stop thinking about it. I don't have a ton of experience with the Big 4 patterns, and I find choosing the correct size tricky. This pattern is designed to be quite body hugging and I was a bit nervous about just how tight it might be, so I chose my size based on the size chart. I planned this to be a wearable muslin so I wasn't overly concerned, and because it's a knit, I figured it would be better too big than too small because I could always slim it down. I traced a size 16 for the shoulders and bust and graded out to an 18. I also went with the shorter version (but I left off the sleeves) as I am short and this seemed like it might be a bit tricky to shorten due to the shingles.

IMG_6911I ended up shaving about an inch off each side seam after it was made up - which means I took a whopping 4 inches off the circumference. It might be slightly tighter than I would have liked, but in the case of a knit body hugging dress, tighter is better than looser, I think. Next time I will probably go down to a 14 or even a 12. Which brings me to a question: how do you choose the right size? I have a bit of weird shape because of my belly (so my waist measurement is always in a bigger size than my bust and hip), and I never seem to get it right, so any advice you dear readers might have would be greatly appreciated. Maybe I'm not pulling the tape measure tight enough? What's the secret? I seem to do better with Indie Patterns, although my latest Papercut Jacket was way too big too. Someday I'll get it right.

IMG_6908The fabric I used for this dress is from Girl Charlee, and it super soft and wonderful to wear. The under dress (that the shingles are attached to) is a plain navy cotton spandex, and the stripes are a cotton jersey. It's actually a bit heavier than you might guess, but it's super soft and comfy - talk about secret pyjamas!

IMG_6909This is probably my main complaint with the dress - I obviously need some sort of sway back alteration to get rid of that pooling at the back. It's okay if I straighten it and stand still, but when I move it looks pretty bad. I'm not entirely sure how to go about doing that alteration because of the shingles, but I think I should be able to just pinch out the excess, and it will probably improve if I get my size right too.

IMG_6905I really love how the stripes look with this pattern, and it think that it works out to be quite flattering. I think it would still look cool in a solid colour, but I think that might make it a bit dressy, and I like to stick with the casual. The construction is really quite simple and straightforward, and because it's made with a knit nothing is hemmed, you just leave the edges raw on all the shingles. I did end up shortening this by about 2 inches, but that is to be expected - I am vertically challenged after all.

IMG_6918I imagine wearing this dress with runners (I love my pink ones, but I think it would be super cute with white converse too) and a denim jacket on cooler days, but it could easily be dressed up with heels. I think it's quite versatile. This is definitely a different style for me, and I feel a bit out of my comfort zone when I wear it, but I do plan on wearing this version and I do want to make it again. It's nice to have something a little different.

Do you ever venture out of your comfort zone with sewing? Would you wear such a body hugging dress? I curious to know what you guys think.

The FF Giveaway Winner

So we like to do things old school over here at Where Heather Grows (which is code for: I don't know how to work those randomizer blog draw things), so I wrote everyone's name down as you commented, put them into a hat, and had John draw the lucky winner. IMG_9283

IMG_9284Poor John was barely awake when I had him do the draw with me this morning.

And the winner of the luscious Funki Fabrics is.......

IMG_9285Yay!! Congratulations Liz!! I will send you an email to get your details - if for some reason you don't receive it please let me know! I look forward to seeing what you come up with using this fabric!

Thanks to everyone who commented and entered!