Happy New Year!

Oh dear! How did it get to be January 15th already?!? I had hoped to blog a bit more than I did in the past month, but so many things got in my way. I caught a terrible "man cold" from who knows where, which kept me in bed for days, and then sadly, a few days after Christmas, my dear Uncle passed away. He had been battling pancreatic cancer for the last year or so, so it wasn't really shocking, but having just had a really great visit with him over Christmas, it was a surprise that his death came when it did. I am so grateful that I was able to have such a great chat with him on Boxing Day and I will hold that memory of him for a very long time. Anyway, enough about that. Let's talk about sewing! 

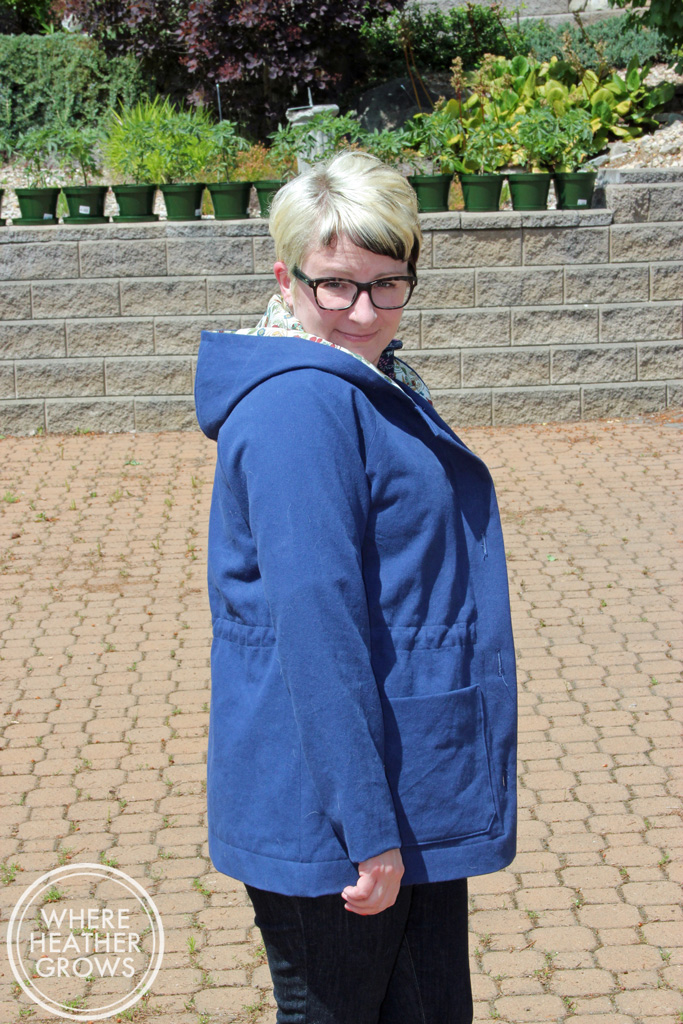
This is the Silvia Coatigan by Schnittchen Patterns. (Heads up - these are not the greatest photos. The white background is not really doing me any favours, plus I seem to have *ahem* misplaced my remote, so I had to do the whole push the button and run in front of the camera thing. Then just as I was all set up it started to snow, so if you see weird white flecks, they're snow flakes.) 

This pattern wasn't really on my radar, until Caroline (of Blackbird Fabrics) made mention of it somewhere (I can't find the post on her blog or instagram, but I swear she mentioned it somewhere). Anyway, I checked it out, and I thought it would be a great in between seasons piece. Calgary is so weird in the winter because of the Chinooks. One day it can be freezing and you need a super warm, down parka, and the next day it's sunny and warm and you are sweating in said parka. So I thought this would be a great "coat" for those days, but I also wanted to keep it soft and fairly unstructured so that I could wear it inside when I'm feeling like I need an extra snuggle.

I ended up choosing this fabulous wool boucle from Blackbird Fabrics, and it worked out perfectly. It's nice and warm, and wooly, but still soft and drapey like a cardigan. I thought that I might be able to get away with not lining this little number, but when the fabric arrived, I decided it was a bit too itchy against the skin to go without a lining. 

I have never worked with wool fabric, or wool coating, so I wasn't exactly sure how to pre-treat it. I did a bit of reading, but then emailed Caroline for some advice. As always, Caroline was very helpful and after emailing back and forth with her,  I decided to try the steam function on our new dryer. After about 30 minutes the steam cycle was complete and the wool looked great with very little shrinkage. If our dryer didn't have that feature, I think you would have steamed it with my iron, but that seemed like so much work - especially when there is another option. I also asked Caroline for her suggestions about lining, and she graciously sent me some lovely modal knit from her personal stash. Sewing friends are the best! The knit fabric is perfect!

As for the pattern, I have never worked with a Schnittchen pattern before, so I was very surprised that the pattern pieces were contained in two separate pdfs. This took me a while to figure out as there was no print/pdf layout. At first I thought I was missing some pattern pieces, but then I remembered the second pdf, and lo and behold, there they were.  This was not my favourite experience putting together a pdf to be completely honest. I had a hard time getting all the markings to match up and the borders weren't super clear, so my pieces were slightly wonky in a few places. Now this might be my printers fault, as it can be cranky sometimes, but I haven't had this much trouble with other pdfs, so I'm not sure.

All that being said, this coatigan came together rather quickly, and I mostly put it together with my serger. I did have a bit of trouble with the lining but I think that's because I haven't lined very many coats/jackets, so I didn't really know what I was doing, plus I was using a knit fabric with a woven. The instructions are only written (and fairly brief but they are translated into english so that's a good thing) with no diagrams which probably works just fine for an experienced coat sewer, but I am very much a visual/kinetic learner and so I require more hand-holding than just words (at least when I'm doing something for the first/second/third time). Anyway I turned to Jen's fabulous tutorial and kinda did my own thing. It turned out pretty well, so I can't really complain. And the knit lining is part of what makes this so cozy, so I'm really happy I didn't leave it out. 

I have pretty much worn this non-stop since I finished it. I wore it around the house with my Hudsons while I was sick, and I reach for it pretty much anytime I'm running out the door (unless it was one of those really cold days we had there). It's slightly bulky, but I think that's part of the appeal. It's like being wrapped in a blanket and I feel really stylish when I'm wearing it. I also love the colour and it goes with everything.

According to the size chart, I should have made a size 42, but I ended up going with a 40 because I knew I was mostly going to wear it open, and I didn't plan on adding any closures. I didn't make any changes to the pattern at all. I thought I might have to shorten it, but I didn't and I think the length is just fine on me. I'm really happy with the fit, and I know I will continue to wear this a lot.

I hope you all are doing well and enjoying your New Year so far. I feel kind of crappy that I didn't get any year end roundups done like I did last year, but C'est La Vie!

Have you ever made a Schnittchen pattern? What did you think?

My #sewingdare: The Waver Jacket

A few weeks ago, Gillian over at Crafting A Rainbow, issued a little challenge to the sewing blogging community: a sewing dare. Just like Truth or Dare at a girlie sleepover, but without the truth and probably less humiliating than some of the things my adolescent friends came up with. Anyway, Gillian specifies that the sewing dare should be something challenging and out of your comfort zone, but still fun. I asked Gillian to give me a dare, and after a bit of thinking, she decided that a good dare for me would be to sew outerwear of some sort. She's good! This was the perfect challenge for me as I have wanted to take a stab at sewing (and lining) a jacket, but have been too chicken to do it. This was just the push that I needed. After a lot of humming and hawing, I finally settled on one of Papercut Patterns' latest releases: the Waver JacketIMG_6841To be completely honest, I wasn't overly enthused with the sample of this pattern on Papercut's website. It looks very lab coatish, but I decided to look past the sample and use the line drawings to visualize a nice spring/fall jacket. Because I was looking for a lighter jacket, I decided to go with the short, drawstring version of the Waver (although I may end up giving the other version a go in a more wintery fabric - it looks quite cute too).

IMG_6828I had some really nice cotton twill in my stash that I bought locally, and I thought it would work perfectly for this pattern. I've never worked with twill before and it's actually really nice to work with - a lot like denim. This stuff is the perfect weight for a jacket, and I can't really describe it, but it has this kind of natural smell to it. It's not a bad smell, just a distinctive smell, kind of like raw denim.  It reminds me of my Dad for some reason. I think maybe he had twill coveralls for working in the garage or a twill jacket or something, because every time I smell this fabric I feel really nostalgic for my Dad. I always find it so interesting that a smell can bring back a really clear memory, or even just a familiar feeling. But anyway, I digress, back to the jacket.

IMG_6830The pdf pattern went together really quickly, and easily ( I really should by stock in Scotch Tape). The only other Papercut pattern I've used is the Rigel Bomber, and I had the hardcopy for that. I am pleased to say that the pdf, was just as nice to work with as their beautifully packaged paper patterns. And there's nothing like the instant gratification of a downloadable pattern. The instructions are very clear and have nice diagrams too.

IMG_6844I chose my size based on Papercut's sizing chart (the medium), but once I had the shell made and tried on, I realized that it was HUGE! Like a massive tent - I'm not kidding!  I quickly asked my Instabuddies (I am such an instagram junkie and I love the little community of friends I've got going on there - so great for sewing questions and support), and most people that answered my call mentioned that Papercut Patterns tend to fit on the larger side. D'oh! Maybe I should have asked that question before I started. I ended up increasing the side seam and sleeve seam allowances by a whole inch! That seemed to work so I did the same thing with the lining pieces. Next time I make this coat (and I am sure there will be a next time) I will probably size down to a small or even (GASP!) an extra-small. I'll take the time to measure the pattern pieces and decide from there.

IMG_6834I think that the trickiest part of making this jacket was "bagging" the lining. The instructions that came with the pattern are really good, but I really wanted to machine sew the lining to the jacket at the sleeves too. The pattern instructs you to hand sew that part, but I hate hand sewing, so I hit up Google to see if there was another way. And of course there was. I used Jen's tutorial, and it worked out really nicely, although I was sweating while I was doing it. I still had to do a little bit of hand sewing to stitch up the opening you need to leave to turn the jacket through, but that was pretty minimal.

IMG_6836I used a Liberty lawn I had in my stash for the lining and it feels amazing, plus I think it goes really well with the blue outer fabric. As you can see, I don't have toggles for the inner drawstring yet. I just haven't been able to find any that I like, but I will. For now, I just cinched the drawstring and tied it in a knot. Not overly professional and it doesn't work quite as well as the proper toggles will, but for now no one really sees it, so I'm okay with that.

IMG_6848The construction of this jacket was straightforward and quite speedy. I think that aside from figuring out the lining bit, it didn't take me much longer than making an Archer. Gotta love those raglan sleeves - so much quicker than set in sleeves. Anyway, while the size isn't perfect I am really happy with the finished product and I am looking forward to wearing it a lot. I made a couple of minor sewing mistakes with this jacket (my seam ripper really is my most used sewing tool) as this was my first run through, but I expect things will go smoother next time around.

I wasn't completely sure this jacket was going to suit me right up until I finished it. I tried it on for John before I put the buttons on, and we were both like, "eh, it's okay...". But once I cinched up the waist and added the buttons we both changed our tunes. It's amazing how such a small thing can totally change the look of the jacket.

This jacket makes me really happy and has rekindled my love for Papercut. I now really want to make another (more attractive and properly fitting) Rigel bomber, as well as try out some of their other patterns too. Plus, this jacket reminds me that I am part of such a great community of sewing bloggers, and Instagram sewers, and I love that! You guys are so great!!

Anyway, thank you Gillian so much for the dare, it was a lot of fun, and I learned a lot too!

Have you participated in this daring challenge, if not would you like to? Gillian set the end date as May 31st (I'm squeezing in just under the wire) but I highly doubt that is set in stone. So if you'd like a dare, just ask. Thanks for reading along, I hope you are enjoying your weekend!